Pages

29 March 2010

CLASSICS: Pimento Cheese

Having grown up in the Southern part of the US, I have some special food prejudices. I love spicy food. I will make a beeline for a coconut cake. I like my tea strong and iced. No sugar (I know). My lifetime ambition is to make good fried chicken (I'm not there, not by a long shot). In the summer, I could happily eat BLT every single day. And I love pimento cheese.


Pimento Cheese. Pimiento cheese. However you spell it, I like it. Dan, who grew up in San Francisco, looks at a Pimento cheese sandwich and says, “eh”. He doesn't hate it, but he wouldn't go out of his way to make it. Or to find it.


I think that's because he didn't grow up with it. The food of our childhood can take us back to happy times, to carefree days. So what if those days really weren't exactly carefree? In truth, while I was learning to love pimento cheese I was also learning to fear Sister Saint Dominic and Wednesday detention.


Today the good Sister is mercifully faded in my memory, while pimento cheese is crisp and clear. It speaks to me of picnics, of swimming holes, of summer. It's March and here in Belgium it's cold. Wet. Last week, I needed a blast of summer. I also needed to clean out the fridge before our trip. Looking around my kitchen, what did I find? Roasted peppers left over from Ajvar. Cheddar cheese. (OK, it's supermarket cheddar, and Belgian supermarket cheddar at that, but it's what I had.) Some pepper cheese from the cheese guy at my Sunday market. And mayonnaise. I always have mayonnaise.


So I whipped up a bowl of pimento cheese. It was very pretty. It was delicious. I ate it on sauerteigbrot―bread we get in Germany that's made with 100% rye flour. It's a dense bread, leavened with sourdough. When I lived in DC, I used to buy this bread at Wholefoods. I like bread that I can slice myself. I can make the slices thin or thick, depending on what I'm using them for. Here, I sliced them thin so that the pimento cheese shone.


If you didn't grow up with pimento cheese, you don't have to despair. You can start now to make memories with it. You can make picnic sandwiches. You can make fancy pants sandwiches too! Perfect for tea, or just to spoil yourself.


Pimento Cheese


1 red bell pepper

120 g / 4 oz sharp cheddar

80 g / 3 oz pepper cheese

2 – 3 Tablespoons good mayonnaise


  • Pre-heat the broiler / grill of your oven.
  • Cut the peppers in sections, and remove the membranes and seeds. You want these segments to be fairly flat, so that the heat will reach them uniformly.
  • Arrange the peppers skin side up on a baking sheet. I used a non-stick baking sheet. If you don’t have one, you might want to line yours with aluminum foil. This gets a little messy.
  • Slide the peppers under the grill and watch them closely. Mine take between 5 and 10 minutes to be done, depending on whether I remember to pre-heat the grill. They’re done when the kitchen smells like heaven and the pepper skins are lifted and blackened.
  • Meanwhile, grate the cheeses.
  • Put the peppers in a paper bag and close it up. Yes, they’re hot. Yes, there’s steam. Using tongs is highly recommended. Set aside to cool.
  • When they’re cool, take the pepper pieces out one at a time and remove the skin with a sharp knife. Usually you can just pull it off, but if the pepper curved under away from the heat you may have to scrape it a little. If it’s really stuck, don’t worry, just leave it. You won’t notice it.
  • When all the peppers are cleaned, put them on a big chopping board. Chop them fairly fine. At this point the peppers have been transmogrified into pimentos.
  • Mix the grated cheese with the pimentos. Stir well.
  • Add the mayo and chill until ready to use.

Serves 4 if they like it and 10 if they don't.


NOTES:

  • Of course, these measurements are approximate. I used the cheese that I had. You can add more or less cheese, mayo, pimento. You're the boss!
  • This is wonderful with whatever hard cheese you have. If I don't have a pepper cheese, I add a pinch or two of cayenne. Just because.
  • For this, I think you need an old-fashioned box grater. You don't want this cheese to be finely grated, so this is not a job for a microplane.
  • The cheese and pimento alone (without the mayonnaise) is excellent in a grilled cheese sandwich.
  • Like many things, this is better next day. I just make a double batch so that there will be leftovers, because once this is ready I don't want to wait to eat it.


26 March 2010

FLASHBACK: The Best Laid Plans...(part 5)


Note: This is a continuing story. Part 1 can be found here, part 2 here, part 3 here and part 4 here. I'm sorry that this is so much text, but I have no photos that can go with this...

After living for a time in Dublin, we returned to DC to close up our house in preparation for our move to Belgium.

Our last months there went by very fast. We set about dismantling our life, step by step. We lived in a three story house, with plenty of room. We'd never had to make decisions about where to put things—there was always more space. Now we had to take it all apart. We planned to put most of the furniture in storage, send some things to my sister, take a few things with us, and leave some things in the house for the tenants. We had found a wonderful couple to rent our house for the two years we planned to be gone.

21 March 2010

Here We Go Again...

Yes, it's that time again. Our travel season is starting, and to kick it off, we're off to visit my mom. We'll be gone almost three weeks. To entertain you while I'm gone I've left some posts which should appear every three days or so. I think we'll have internet access from time to time, so I should be able to check in and see what you're up to...

So wish me a bon voyage and have a HOPPY EASTER, ok?

18 March 2010

Peter Piper's Peppers

Peter Piper picked a peck of pickled peppers. Who could eat the pickled peppers Peter Piper picked? Can you say that five times fast? No, I can't either. Neither can I pronounce the name of this gorgeous mix of vegetables: Ajvar.


When I saw the photos of Ajvar here, I knew it was something I would love. I wanted the recipe. I wanted to make this. I wanted to eat it till I had had enough of it. And I have to tell you that took a long time. This is delicious.


I’ve made this several times now. The last time I used three different colors of peppers. It was gorgeous. The colors of Spain. No, that’s not right--the colors of Catalonia. I roasted the peppers and eggplant and added some hot pepper oil that we keep in the cupboard. That’s all. Because I’m still limiting my wheat, I ate this on corn chips. With a salad, it made a lovely lunch.


This would make a very nice appetiser or aperitif for company. It would also be wonderful in a sandwich with some sliced chicken.


Instead of roasting the peppers and eggplant in a hot oven, I roasted them under the grill. I turned it up to “doomsday” and let ‘er rip. The skin on the peppers blistered and lifted up. The eggplant softened. When they were good and blistered (sort of like my skin at the beach) I put them in a paper sack till they had cooled. At that point it was very easy to remove the skin from the peppers. Doing it this way also spared my smoke detector.


I used a hot pepper oil in this because I like hot spicy things. We keep this in the kitchen. It’s easy to make: just crush up some dried chili peppers and put them in some good quality olive oil. Leave it for a few days and voila ! Hot pepper oil.


Ajvar

from Kate in the Kitchen


2-3 bell peppers

1-2 small eggplants

Hot pepper oil

Salt if you must


  • Pre-heat the broiler / grill of your oven.
  • Cut the peppers in sections, and remove the membranes and seeds. You want these segments to be fairly flat, so that the heat will reach them uniformly.
  • Remove the stem cap from the eggplants and cut them in half lengthwise. If you have a larger one, you might want to cut it in three or four slices.
  • Arrange the veggies on a baking sheet. The eggplants should be cut side up and the peppers should be skin side up. I used a non-stick baking sheet. If you don’t have one, you might want to line it with aluminum foil.
  • Slide the veggies under the grill and watch them closely. Mine took between 5 and 10 minutes to be done, depending on when I had remembered to turn on the grill. They’re done when the kitchen smells like heaven and the pepper skins are lifted and blackened.
  • Using whatever handy-dandy tong-like apparatus you have, put the veggies in a paper bag and close it up. Yes, they’re hot. Yes, there’s steam. Use the tongs and trust me, ok? Set aside to cool.
  • When they’re cool, take the pepper pieces out one at a time and remove the skin with a sharp knife. Usually you can just pull it off, but if the pepper curved under away from the heat you may have to scrape it a little. If it’s really stuck, don’t worry, just leave it. You won’t notice it.
  • When all the peppers are cleaned, put them on a big chopping board with the eggplants. Get your favorite big cheffy knife and chop away till it’s the texture you want.
  • Put it all in a big bowl and add some pepper oil. Taste and add salt if you want.

Serves 4 if they like it and 10 if they don't.


NOTES:

  • You can spray the cut surface of the eggplant with a little oil, but I found it didn’t make much difference--it got really crispy however I did it.
  • This can also be served with crackers or pita, of course.
  • This would be awesome on bruschetta. Thanks to Barbara for the idea!
  • Another great idea from Bob: baked in puff pastry cups as an appetiser. YOWza.
  • Susan suggested serving this over grilled cod. Carol would use grilled wild salmon. Either way, perfect.
  • Tossed with pasta! Of course. Thanks, Pam.
  • Linda suggested Pizza. DOH! Why didn't I think of that?
  • ...and Grace, a woman after my own heart, would eat this on a spoon. Oh, yeah. I'm there.


15 March 2010

PHOTO RESCUE: Level Adjustment

I know, I know. We’re supposed to take good photos and not have to rely on Photoshop or another photo processing software package to make them good. In my next life I’ll be able to do that. In this one, however, my photos sometimes need help. I’ve been working with a couple of friends who are photographers to improve my photos--both as I take them and as I process them. I’d like to share with you some of what I’ve learned.


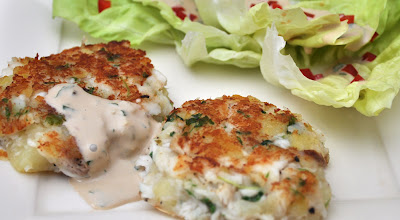
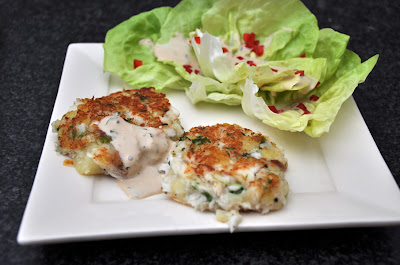
When my photos don’t turn out full of light, I can sometimes rescue them. One way is to adjust the levels. Have a look at this photo:


This photo didn’t start life like this. It needed a little rescue. It started life like this:


Ew. Underexposed. Dark. Too busy. Strange perspective on the plate. Not straight. This one looked like it might need major plastic surgery! But no. In two steps it looked much better. I simply adjusted the levels and cropped it. VOILA.


I can hear you now: ok, Kate, but how do you adjust the levels? The levels of WHAT? It’s really not very hard--if I can do it you can do it. Every photo manipulation package should allow you to adjust the levels. I’ll show you how to do it, but you have to promise to keep it a secret, ok? Just between us...


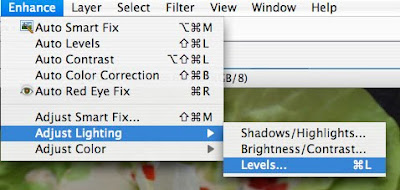
Here’s how. First, find the levels dialog box. In Photoshop Elements, it’s here:


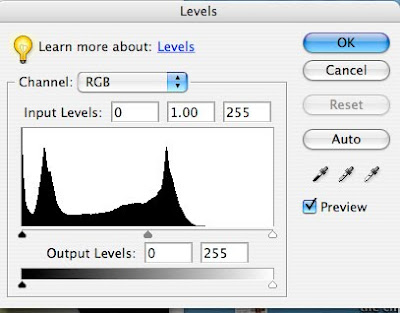
When you click on Levels, you get this dialog box:


YIKES! That looks pretty scary. I used to avoid the bit on the left and only use the little droppers that let me choose a white or a black point. The problem is that you don’t always have a white and a black point. And even if you do, that may not give you what you want. It’s better to get over your fear of the levels graph...


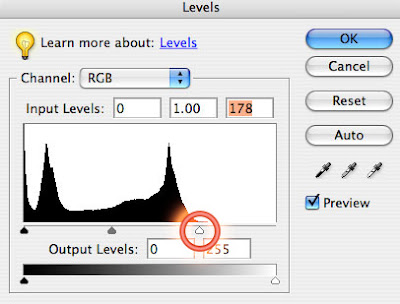
So now look at that graph on the left. It shows the distribution of colors from black (on the left) to white (on the right). The higher the line, the more of that color is there. Don’t worry too much about that--what’s important to know is that a good graph goes all the way across the range. This one doesn’t do that--it stops about two-thirds of the way. The whole right (white) side is zero. There are no real whites in my photo. If we look at the left-hand side (the black side) of this graph, we see that the line goes all the way to the top. There’s a lot of black in this photo. That’s because my countertop is black.


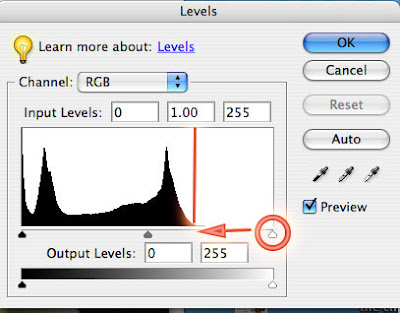
Ok, we knew that--we can SEE it. But we just need to know how to fix it. This graph is one very good way to do that. See the little pointer at the bottom right hand corner of the graph? I’ve circled it for you here.


You want to click on that and move it to the left until you get to the point where there is some black on the graph. I’ve marked that point with a red line here.


When you’re finished, the graph looks like this:


If you click on “OK”, then you'll see that some magic has happened to the photo:


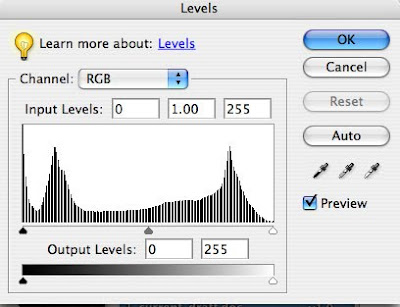
If you click on 'Levels' again, here’s what the graph looks like now:


See how the graph now extends all the way across? That means that you’ve got values all the way across the range. That’s GOOD. See those white lines in the graph? They're there because you’ve stretched limited data across the value range. You don't want them to be too big, because if you stretch the graph too far, you’ll see bands of color like on the old televisions. That’s not good. Unless they’re really wide you won't see any effect of them--this amount of ‘stretch’ is ok at this resolution. Howver, I might have some problems if I tried to blow this photo up really big.


So now our photo looks better. However, it’s still not done. It needs a good crop. In order to focus on the fish cakes, I cropped it like this:


If this is the photo I’ve chosen to submit to any of the food photo sites, though, I crop it differently. I make sure it’s square, because if I don’t crop it, they will. And I want to make sure that it’s MY crop that gets seen.


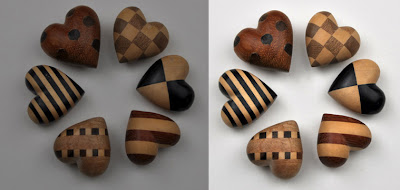
Here’s another photo, before and after a levels adjustment:


Let’s look at one more. This photo wasn’t too bad to start with. It just needed a little bit of help. Look what happened when I adjusted the levels:


In a perfect world, all of my photos would be perfectly exposed. One day that will be the case. They’re getting better. Still, levels adjustment is a tool that I use often. It can add a brightness to photos and make them shine.


Now for the homework (Whaaat?) Find one of your photos that's a little dark and gray. Try this with it. Let me know how it turns out, ok?


I’d love to know what tips you have for improving photos.


EDIT: You don't need to have photoshop to do this. Any photo software should let you adjust levels. If yours doesn't, download GIMP for free: http://www.gimp.org/ GIMP looks a lot like Photoshop, and has most of the same functions. You'll find tutorials and complete documentation as well. I have a MAC and it works on that too.

12 March 2010

CUISSES DE CANARD. CONFIT.

One of the wonderful things that we discovered after we’d moved to Belgium is duck confit. In French, it’s called cuisses de canard confit. Cuisses de canard means duck thighs. Confit is a word that doesn’t translate well into English. Prepared? Pickled? Preserved? Not exactly the same thing, but in that family of ideas.


Here’s how they’re made: duck thighs are packed in a mixture of salt and herbs for a day or so to draw out the moisture, and then they’re cooked gently in goose fat (or duck fat) for a few hours. This produces a meat that has a very special texture and a wonderful flavor. Cooled and packed in the goose or duck fat, they keep about six months. Making them, though, is a complicated process, so we just buy them.


Finding them at the supermarket, though, is not without its problems. The first time I went looking for them in my supermarket, I went to the aisle I thought was the appropriate one, and found a (very nice looking) young man stocking the shelves.


In my very best French, I asked him if he had ‘cuisses de canard’, duck thighs. You can see what’s coming, can’t you? No, actually, it was worse than that. In French, the word canard means ‘duck’. It’s pronounced KAH-nahr. Being a native English speaker, I tend to be a little sloppy with my vowels. What I actually asked him was if he had cuisses de KUH-nahr. Not really hard to understand, given my (ahem) slight accent.


The problem is that there’s another word that’s close to that one--connard. Pronounced KOH-nahr. It’s a word that Sister Mary Francis didn’t teach us in French I. Or even French IV. It’s extremely rude.


So when I asked this young man if he had cuisses de KUH-nahr, he looked down at his own thighs and said, “I hope not, Madame.” Oh, man. What could I do? I looked him straight in the eye and said, “Confit, Monsieur. Confit.” At which point he laughed and showed me where they were. Since then I’ve been veryvery careful with my vowels when discussing cuisses de canard confit. I’d advise you to do the same thing.


Normally I find cuisses de canard in cans or glass jars. However, the ones I bought most recently came vacuum packed in plastic. To prepare them, you put them in a pan in a moderate oven for about 10 minutes. The idea is just to melt all the goose fat around them so that you can get the gorgeous meat.


When they’ve cooled, you still have to remove the skin and the gristle and the bones. You’re left with shreds of duck meat that is deeply flavorful, with a texture sort of like prosciutto. It can be used in many ways. One of my favorite is in a salad of greens with a blue cheese vinaigrette. This is a really nice dish for this time of the year--the meat is hearty and the salad is light.


If you're like me, you'll have made more of this than you eat at one time, because you LOVE leftovers. Here's an idea for how to use leftover duck.


Salade de Cuisses de Canard Confit


2-3 cuisses de canard

approx 3 Tablespoons mild vinegar

1/2 teaspoon mild mustard

3-6 Tablespoons Olive oil

approx 50 g / 2 oz blue cheese

Lettuce--your favorite mixture


  • Pre-heat the oven to 160 C / 350 F
  • Free the duck thighs from their packaging (can, jar, plastic). Put them in an oven-safe pan in the oven for about 10 minutes or until the fat that they’re packed in is melted.
  • Remove the pan from the oven and take the duck thighs out of the fat. Drain on paper towels, and leave till cool enough to handle.
  • Put the vinegar in a large salad bowl. Add the mustard. I use Dijon mustard for this. It really doesn’t matter too much, because the mustard is mostly only there to make the oil and vinegar emulsify. Whisk the mustard and the vinegar together till combined well.
  • Add olive oil slowly, whisking constantly to form an emulsion. You want this to be a runny vinaigrette, so you’ll use about the same amount of oil as you had vinegar, maybe a little more.
  • Crumble the blue cheese into the vinaigrette, and let sit while you wait for the duck to cool.
  • When the duck is cooled, remove the fatty skin and bones and gristle from the meat. Shred it into pieces as large or small as you want and set aside.
  • Wash and dry the lettuce, tear it into the salad bowl. Toss gently until the dressing is thoroughly mixed with the greens.
  • Put on your prettiest plates and top with the duck confit.
  • Practice your French pronunciation: KAH-nahr. KAH-nahr. OK, now you can eat.


Serves 4 if they like it and 10 if they don’t.


NOTES:

  • Traditionally, after the duck thighs are removed from the fat, they’re fried (skin side down) to make a crispy skin and served like that. That’s a wonderful way to eat this, but for me it’s a little too fatty. I like to take the skin off and just eat the meat.
  • After you’ve used the meat, the fat that it’s packed in is wonderful for cooking. Traditionally, it’s the fat that’s used to cook potatoes or to fry anything that needs flavor added. It keeps for a long time in the fridge.
  • If you can’t find cuisses de canard confit in your area, here’s a recipe for making them at home. Here’s a video from Gourmet Test Kitchens that shows it too. I encourage you to look for them, though. It can be fun. Just be sure to specify that you want them confit. And watch your vowels...


08 March 2010

FRIDAY FISH

Growing up in an Irish Catholic family meant that we ate fish on friday. Every friday. Without fail. The only exception we ever saw was when my older brother had rheumatic fever and the doctors wanted him to eat beef every day to strengthen his heart. Heh. I know. But it was the best medical wisdom at that time. My grandfather had the same advice after his heart attack, and he lived to be 87.


Actually, as Catholics, we weren’t obliged to eat fish. We just couldn’t eat meat. Except my brother. At our house, though, 'no meat' meant fish. So we ate fish every Friday. We didn’t live especially close to the sea (Atlanta), and the selection of fresh fish at that time wasn’t great. We were also a large family (Irish Catholic, remember?). All of this meant that we ate a lot of the dreaded Tuna Noodle Casserole. With potato chips on top. No peas. We also ate a lot of salmon patties made from canned salmon. I still like these. I haven’t made them in a long time, though. Hmmm....


Because we didn’t live near the sea, the fish we ate was most often canned. Tuna and Salmon. Sometimes frozen, from the kitchen of our friend Mrs. Paul. She always made her specialty for us, fingerfish, a species that must be extinct now. At least I hope so.


In the summer, it was different, because we could go to the beach (St. Simon’s Island). At the beach we ate fish. Crabs. Shrimp. Lobster. All of it. We loved it. Somehow, though, we didn’t eat fresh fish at home. In later years, my parents used to bring home frozen shrimp and crabs. But they waited till I had left home to do that. I’m not bitter, though.


All this meant that I didn’t have a big taste for fresh fish. Shrimp, yes, but not fish. I didn’t know anything about them either. I liked to order trout in restaurants because I loved eating the flesh on one side and then unzipping the backbone to get at the other side. I still like to do that.


It was only when we moved to Belgium that I began to seriously cook and love fresh fish. Here, we are close enough to the sea to have fresh fish readily available. Everyone has their favorite fish market. For some, it’s in nearby Soumagne. For others, it’s in Herve. Or even the supermarket. My friend Françoise swears by the fish monger who’s in the town of Ensival for its weekly market. Me, I shop around.


I’ve developed a taste for fish. We still associate it with Fridays, but we eat it other days of the week as well. I find myself in the strange position of knowing the names of my favorite fish in French but not necessarily in English. Some of them have names that are not so pretty in English--rouget, for example, is mullet in English. Makes me think of a bad hair style...


Where was I? Oh, yes. We try to buy fish that’s sustainable and relatively local. This usually means tilapia or plaice or pollack or cod from Iceland. My favorite fish is the trout caught by one of our friends. He doesn’t really like to eat it, so he and his wife freeze it and sometimes they give it to us. YUM!


This dish is one that I first made one night when we were going out of town and we had some leeks and tomatoes in the fridge. And some fish. You can use any firm-fleshed white fish for this. It’s veryvery easy, and the flavors are delicate and healthy and clean--tomatoes, leeks and of course the fish. I serve it to company. On Fridays, of course!


Friday Fish


4-5 large leeks

10-12 small tomatoes (golf ball size)

400 g / 1 pound white fish

2 Tablespoons + 2 Tablespoons olive oil


  • Preheat the oven to 160 C / 350 F.
  • Cut the root ends off the leeks, and the hard green part. Cut them in half lengthwise, and wash them thoroughly under running water to remove all the sand and dirt between the layers. I just hold them near the base in one hand and with the other separate the layers and wash between them.
  • Slice the leeks into pieces about 2 cm / 1 inch long.
  • Heat 2 T olive oil in a large pan and add the leeks. Cook over medium-low heat till the leeks have released their liquid and are soft. This should take about 10 minutes.
  • Put the leeks in a baking dish.
  • Cut the fish into pieces about half the size of the palm of your hand. They should be roughly the same size so that they cook at the same rate. If there are some that are thinner than others, double them up. Nestle the fish pieces down into the leeks.
  • Cut the tomatoes in quarters. Put the tomato pieces down into the leeks between the fish pieces.
  • Drizzle 2 T of olive oil over the fish.
  • Bake till the fish is opaque and flakes easily--about 20 minutes.


Serves 4 if they like it and 10 if they don’t.


NOTES:


  • I often serve this with new potatoes, steamed and then crisped in a non-stick pan in a little olive oil. The crunch goes well with this dish.
  • Good crusty rolls go well too. I think you need some crunch.
  • Sometimes I just steam the potatoes and add them to the dish with the fish. Then I need crunch from rolls or something else.
  • You can use flavored oil to drizzle over the fish--sometimes I use lemon flavored oil. Pepper oil wouldn’t really work here--it would kill these delicate flavors.


04 March 2010

GOING POSTAL

One of the interesting things about living in Belgium is learning to deal with the vagaries of the post. Sometimes you win, sometimes you lose. If I put a letter in the post today, it will be delivered anywhere in Belgium tomorrow. That’s impressive to me. A bookstore in Siena once sent me some books on a Friday and I had them on Monday. From Germany or Switzerland I might expect that kind of efficiency, but from Italy? I know.


On the other hand, sometimes things go astray. My mom sent me a book in November, and it’s still somewhere in never-never land. I ordered some business cards from England and they never arrived. You just never know. You never even know where the problem occurs--here or there? You just know that it didn’t arrive.


If you’re like me, you also wonder what unsolicited surprises are lost in the mail. Maybe I won the Publisher’s Clearing House Sweepstakes! Oh, wait, you can’t win if you don’t enter. My invitation to the Galactic Blogger Awards? It must be in the post somewhere.


We received this in the post this week from an artist friend in Canada. He posted it on December 20. The address was correct.


I always wonder what's happened with things like this. In this case, we have a clue:


It’s been on vacation. While we were here freezing, battling snow and ice, this envelope has been having adventures. It's been to Bermuda. No doubt it stowed away on the Bermuda plane, having heard our weather forecast. It's been opened by HM Customs, it's been re-sealed and it's been sent to me in BELGIUM. Not Bermuda.


Then Dan and I had a good laugh when we saw this:


"From anywhere...to anyone"


Yes, and by way of who-knows-where!


We're pretty used to this stuff by now. With this one, though, there's still one thing that bothers me.


That envelope?


It's got a tan.